

A motorhome battery that reaches low voltage before breakfast is rarely just a battery problem. It is usually a system-sizing problem: insufficient solar input, unsuitable charging settings, undersized cabling or greater daily consumption than expected. A solar kit for motorhome with lithium battery should be specified as one working electrical system, not as a panel and battery bought separately.
LiFePO4 technology changes what a motorhome electrical system can deliver. Compared with conventional lead-acid leisure batteries, it provides more usable capacity, accepts charge faster and maintains a steadier voltage under load. That makes it particularly effective for off-grid touring, remote work, overnight stops and longer stays away from hook-up – provided the solar array, charge controller and protection hardware are correctly matched.
Start with the energy you actually use
The battery capacity and solar wattage should follow your real daily consumption. Begin by listing the appliances used away from mains power, their power rating and the number of hours they run each day. Lights, water pump, USB charging and a compressor fridge are typically modest loads. A coffee machine, hair dryer, induction hob, microwave or electric heating are very different demands and normally require a suitably sized inverter as well as substantial battery capacity.
Energy is best calculated in watt-hours. A 50W laptop charger used for four hours consumes around 200Wh. A 12V compressor fridge may use 400Wh to 700Wh over a day depending on ambient temperature, ventilation and how often the door is opened. Add a sensible margin for cloudy weather, seasonal changes and battery charging losses.
For many touring motorhomes, a 12V 100Ah LiFePO4 battery is a practical starting point. It stores roughly 1,280Wh of nominal energy, with most of that capacity usable. A 200Ah battery offers around 2,560Wh and provides considerably more reserve for extended off-grid use. The right choice depends on the load profile, not simply the size of the vehicle.
A useful planning rule is to size storage first for one to two days of normal use, then size solar to replace a typical day’s consumption during your intended travel season. In southern European summer conditions, solar harvest can be strong. In a British spring, autumn or shaded campsite, the same panel will produce much less. Solar reduces dependence on hook-up, but it cannot guarantee full charging in every location or weather condition.
Choosing a solar kit for motorhome with lithium battery
A properly specified kit contains more than solar panels. At minimum, it requires panels, an appropriately rated solar charge controller, correctly sized cables, connectors, fuses or circuit breakers, and mounting hardware. The battery, inverter and DC distribution should also be assessed as part of the same design.
Match panel wattage to touring style
A 100W panel is suitable for maintaining a small lithium battery and supporting light use in favourable weather. It is often not enough for a compressor fridge, device charging and regular inverter loads. For general motorhome touring, 200W to 300W of roof solar is a more capable range. A 400W array can be appropriate for high usage, larger battery banks or extended off-grid stays, assuming roof space allows it.
Rigid monocrystalline panels are a dependable choice where permanent roof space is available. They offer strong output per square metre and a long service life. TOPCon and PERC panel technologies can improve output efficiency where every centimetre of roof area matters. Flexible panels are useful on curved surfaces or where low profile installation is required, but heat management and mounting quality need closer attention. Portable folding panels offer valuable flexibility when the motorhome is parked in shade but a sunny pitch is available nearby.
Roof-mounted panels produce power while driving and need no daily setup. Portable panels can be aimed directly at the sun, but must be stored, deployed and secured each time. Many motorhome owners benefit from a fixed roof array for baseline charging plus a portable panel for difficult pitches.
Use an MPPT controller for best lithium charging
An MPPT solar charge controller is normally the preferred option for a lithium motorhome system. It converts surplus panel voltage into additional charging current and performs particularly well when panel voltage is significantly above battery voltage. This is valuable in variable sunlight and with higher-wattage arrays.
PWM controllers remain suitable for smaller, simple 12V installations using matched panels, but they generally recover less available solar energy. The saving on the controller can be false economy if it limits charging output throughout the life of the system.
The controller must support a LiFePO4 charging profile or allow custom settings. Lithium batteries require different absorption and float settings from lead-acid batteries, and equalisation must be disabled. A typical 12V LiFePO4 battery is charged at approximately 14.2V to 14.6V, but the exact voltage must always follow the battery manufacturer’s specification.
Controller current rating is equally important. A 400W solar array charging a 12V battery can produce more than 30A under favourable conditions, so a 40A MPPT controller would be a sensible minimum in many cases. Allow headroom rather than operating the controller continuously at its limit. Check both the maximum PV open-circuit voltage and the maximum charge current before connecting the array.
Build the battery bank around usable capacity
LiFePO4 batteries are well suited to motorhomes because they deliver high usable capacity at a lower weight than comparable lead-acid storage. They also maintain voltage more consistently, which helps sensitive 12V equipment and inverter operation. Long-life LiFePO4 units rated for 6,000+ cycles can offer substantial value over years of touring when correctly installed and charged.
A 12V system is the straightforward choice for most motorhomes. It integrates easily with existing DC lighting, pumps, fridge controls and vehicle-oriented accessories. A 24V battery system can reduce current and cable size in larger installations, especially where inverter loads are high, but it requires 24V-compatible charging and distribution equipment or correctly designed DC-DC conversion.
Do not choose battery capacity based only on amp-hours. Compare watt-hours, allowable continuous discharge current, low-temperature charging protection, physical dimensions and terminal layout. A battery must fit the available compartment, be securely mounted and remain accessible for inspection and isolation.
Do not overlook charging from the alternator
Solar is one charging source, not the whole answer. A motorhome alternator can replenish significant energy while driving, but a lithium battery should usually be charged through a properly rated DC-DC battery-to-battery charger. This controls charging current, provides the correct lithium profile and protects the vehicle alternator from excessive continuous demand.
Direct replacement of a lead-acid leisure battery with LiFePO4 is not always appropriate. Older split-charge relays, smart alternators, factory-fitted chargers and solar regulators may not provide suitable voltage or current control. Check every charging source: solar controller, mains charger, alternator charger and, where fitted, generator or shore-power inverter-charger.
Cable size, fusing and isolation are part of performance
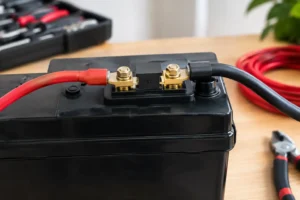
Even premium batteries and efficient panels cannot compensate for poor installation practice. Undersized cable creates voltage drop, wastes solar harvest and can become a safety risk under high current. Keep battery-to-inverter cables short, use cable sized for the expected current and install correctly rated fuses close to the battery positive terminal.
Every major circuit needs suitable protection and isolation. This includes the solar input, controller-to-battery connection, inverter supply and DC-DC charger circuit. Solar panels remain live in daylight, so provide a PV isolator or disconnection method before servicing the controller. Use quality crimp terminals, strain relief and weather-resistant roof cable entries.
An inverter deserves particular care. A 1,000W inverter on a 12V system can draw well over 80A, while a 2,000W unit may exceed 170A. The battery’s continuous discharge rating, cable cross-section, fuse rating and ventilation must all support this load. High-power AC appliances may be technically possible, but they can consume a day’s battery reserve in a short time.
A practical motorhome system example
For a motorhome with a compressor fridge, LED lighting, water pump, router, mobile phone charging and occasional laptop use, a balanced system could combine a 12V 200Ah LiFePO4 battery with 300W to 400W of roof solar, a 40A MPPT controller and a correctly sized DC-DC charger. This gives useful autonomy without relying on an oversized inverter for heavy domestic appliances.
For lighter weekend use, a 100Ah lithium battery, 200W solar array and 20A or 30A MPPT controller may be sufficient. For full-time touring, regular remote work or frequent inverter use, consider increasing storage before adding excessive panel wattage. More solar is valuable only when there is battery capacity available to accept the energy.
QuantEnergo can help match LiFePO4 storage, solar technology, MPPT regulation, inverters and protection hardware to the available space and intended loads. The best installation is not necessarily the largest one. It is the one that charges reliably, protects every circuit and gives you the electrical reserve to stop where the view is better than the hook-up point.



No comment yet, add your voice below!